10 Easy DIY Projects Using Free Wooden Pallets
I LOVE finding a free pallet! Seriously, there’s so much you can do with a few pieces of wood that someone else was ready to throw away. From garden projects to farmhouse-style furniture, pallets are one of my favorite ways to make something useful without spending a fortune.
And you don’t need to be an expert woodworker! Some of these projects take less than an hour, while others make great weekend projects. I’ve included the supplies, instructions, and a few tricks to make each one easier.
Before You Start: How to Choose a Safe Pallet
Not every free pallet is worth bringing home. Check for broken boards, protruding nails, stains, chemical smells, mold, and signs of pests. Look for an IPPC treatment stamp on the wood:
- HT: Heat-treated wood. This is preferable to chemically fumigated pallets, but it doesn’t guarantee the pallet is clean or uncontaminated.
- MB: Methyl bromide fumigation. Avoid these pallets for DIY projects.
- No stamp: Treatment and origin may be unknown. Don’t assume the wood is safe just because it looks clean.
For indoor furniture, food-related projects, and gardens, choose clean, untreated or heat-treated wood with a known history. Never use pallets that transported chemicals or have unexplained spills.
Basic tools to keep handy: Work gloves, safety glasses, a hammer, pry bar, drill, screwdriver, measuring tape, saw, sandpaper, and exterior-rated screws. You won’t need every tool for every project.
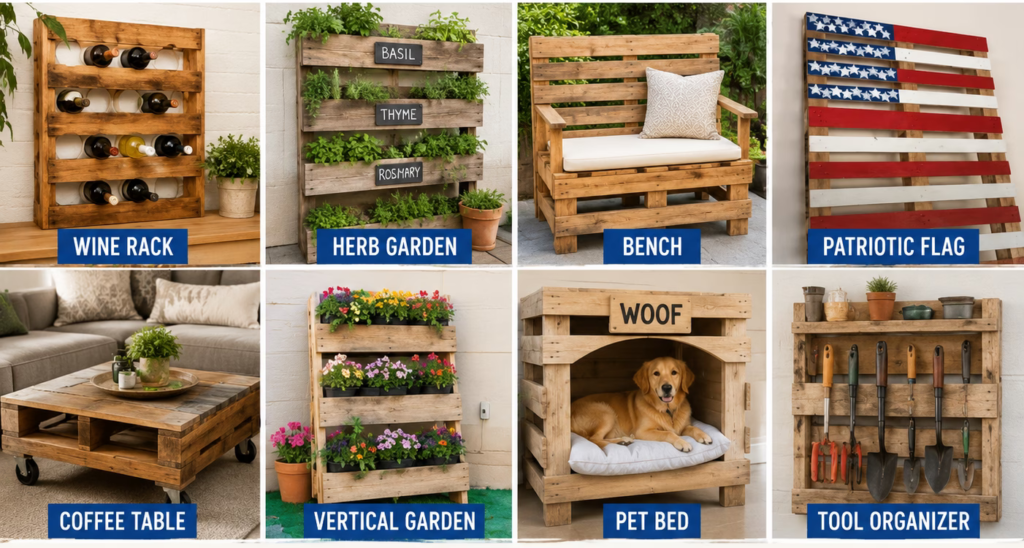
1. Patriotic Pallet Flag or Outdoor Art
This is one of the easiest projects to make with a free pallet, and you can change the design for just about any holiday. Make an American flag for the Fourth of July, a pumpkin for fall, or a simple welcome sign for your porch.
You’ll need: One pallet, red, white, and blue outdoor paint, paintbrushes, sandpaper, and a star stencil or sponge.
Instructions
- Choose a clean pallet with boards that are still securely attached. Remove loose nails and sand rough edges.
- Brush off dirt, wash if necessary, and let the wood dry completely.
- Paint alternating horizontal boards red and white. You can use painter’s tape for cleaner stripes.
- Paint a blue rectangle in the upper-left corner.
- Once the blue paint dries, add white stars using a stencil or sponge.
- Let everything dry, then apply an outdoor clear coat if you want extra weather protection.
- Lean your finished flag against a porch wall or secure it so it can’t tip over.
Money-saving tip: Check your garage for leftover paint before buying anything. This is a great way to use up those almost-empty cans!
2. Vertical Pallet Herb Garden
Short on garden space? A pallet can become a vertical planter for herbs, flowers, or small leafy plants. It’s especially handy for patios and balconies.
You’ll need: One clean pallet with a known history, landscape fabric or planter pockets, exterior staples or screws, potting mix, and plants.
Instructions
- Sand the pallet and remove any loose nails or splintered boards.
- Lay the pallet flat with the back facing up.
- Attach heavy-duty landscape fabric to create individual planting pockets behind the front slats. Reinforce the bottoms so soil won’t fall out.
- Leave drainage openings in each pocket so excess water can escape.
- Fill the pockets with potting mix and add your plants.
- Water gently and allow the plants to establish while the pallet is lying flat.
- Once established, stand the pallet upright and securely anchor it to a suitable support so it cannot fall forward.
Money-saving tip: Mint, parsley, thyme, and oregano are good candidates for a small herb garden. Keep mint in its own pocket because it spreads quickly.
Important: For edible herbs, use new food-safe planter inserts or containers rather than allowing soil to contact reclaimed pallet wood of uncertain origin.
3. Simple Pallet Garden Bench
A rustic bench is perfect for a porch, garden, or backyard sitting area. This project takes a little more work, but you can make a surprisingly nice bench with reclaimed lumber.
You’ll need: Two pallets or enough reclaimed pallet boards, 2×4 lumber for a structural frame, exterior-rated screws, a saw, drill, sander, and outdoor cushions.
Instructions
- Decide how wide and deep you want your bench. A seat height around 17–19 inches works for many adults.
- Disassemble the pallets carefully, saving the straightest boards for the seat and backrest.
- Build a sturdy rectangular seat frame using sound structural lumber and attach properly braced legs.
- Screw the pallet boards across the frame to create the seat, leaving small gaps for drainage.
- Build a separate backrest frame and securely fasten it to the seat frame with structural supports.
- Add diagonal bracing as needed to prevent wobbling or racking.
- Sand every surface, especially the seat and arm areas.
- Finish with an outdoor wood sealer and add cushions.
Money-saving tip: Old outdoor chair cushions can work just as well as new ones. Check clearance racks or use cushions you already have.
Safety note: Don’t rely on pallet slats alone to support a person’s weight. Use properly sized structural framing and test the bench for stability before sitting on it.
4. Rustic Outdoor Coffee Table
This is one of my favorite beginner projects because you can make a functional outdoor table without complicated woodworking.
You’ll need: One or two pallets, exterior screws, sandpaper, a drill, and optional casters or table legs.
Instructions
- Clean and sand the pallet, removing loose nails and rough edges.
- Choose the height you want. For a taller table, stack two compatible pallets and fasten them securely together.
- For a smoother tabletop, remove extra boards from another pallet and cut them to fill the gaps.
- Attach the additional boards with screws, keeping the screw heads flush with the wood.
- Add suitable legs or locking casters if desired. Make sure the fasteners are anchored into solid framing.
- Sand the tabletop again and apply an outdoor-rated finish.
Money-saving tip: Skip the wheels if you’re trying to keep this project completely free. A low pallet table looks great on a patio without them.
5. Mudroom Pallet Shoe Rack
Tired of shoes piling up by the door? Turn a pallet into a simple entryway organizer!
You’ll need: One pallet, sandpaper, wood screws, a drill, wall anchors appropriate for your wall, and optional paint.
Instructions
- Choose a pallet with openings wide enough to hold your shoes.
- Remove any unnecessary boards and exposed nails.
- Sand the entire pallet thoroughly so shoes and hands won’t catch on splinters.
- Add small horizontal support boards where needed to create stable shoe shelves.
- Paint or stain the rack to match your entryway.
- Position the pallet against the wall and secure it to wall studs or suitable structural supports using proper brackets.
- Slide shoes into the openings or arrange them on the shelves.
Money-saving tip: Add a few leftover hooks to the sides for keys, dog leashes, or reusable shopping bags.
6. Rustic Pallet Wine Rack
A pallet wine rack makes a nice kitchen decoration or homemade gift. You only need a small section of a pallet for this one.
You’ll need: Pallet boards, saw, drill, screws, sandpaper, stain or paint, and heavy-duty mounting hardware.
Instructions
- Cut or disassemble a small section of the pallet to create the size rack you want.
- Use the boards to build a rectangular wall-mounted shelf with a solid bottom and a front retaining rail.
- Make the shelf deep enough to support the bottles securely.
- If you’d like hanging wine-glass storage, add a separate slotted holder underneath with openings sized for your glasses.
- Sand every edge and apply your chosen finish.
- Fasten the rack securely into wall studs with hardware rated for the weight of the rack and full bottles.
- Test the shelf’s stability before loading it.
Money-saving tip: Leftover wood stain or paint can make a homemade rack look surprisingly expensive.
7. Garden Tool Organizer
Keep shovels, rakes, and brooms from falling all over the garage with this easy pallet storage project.
You’ll need: One pallet, drill, screws, sturdy wall brackets, and optional hooks.
Instructions
- Choose a sturdy pallet with evenly spaced boards.
- Remove damaged wood and protruding nails, then sand any rough areas.
- Position the pallet vertically against a garage or shed wall.
- Secure it firmly to wall studs using appropriate brackets and structural fasteners.
- Slide long-handled tools into the spaces between the boards.
- Add hooks for hand tools, gardening gloves, or extension cords.
Money-saving tip: Old hooks and leftover hardware from other projects are perfect for adding extra storage.
8. Rustic Pallet Picture Display
This is a fun way to display family pictures, postcards, kids’ artwork, or seasonal decorations without buying expensive frames.
You’ll need: A few pallet boards, sandpaper, wood stain or paint, small clips, screws, and picture-hanging hardware.
Instructions
- Carefully remove several boards from a clean pallet.
- Cut the boards to your desired length.
- Sand all sides and edges until smooth.
- Arrange the boards horizontally, leaving small spaces between them.
- Connect them from behind using narrow support strips and screws.
- Paint or stain the wood and allow it to dry.
- Attach small clips or clothespins to the front.
- Install suitable hanging hardware and secure the display to the wall.
Money-saving tip: Print photos at home or use inexpensive photo-print promotions to change your display throughout the year.
9. DIY Pallet Compost Bin
If you garden, this one is especially useful! A compost bin turns leaves, grass clippings, and kitchen scraps into valuable material for your garden.
You’ll need: Three or four clean pallets, exterior screws or sturdy brackets, a drill, and optional hinges or latches.
Instructions
- Choose a level, well-drained spot in your yard.
- Stand three pallets upright to form the back and two sides of a square.
- Fasten the corners securely using exterior-rated screws and brackets.
- Use a fourth pallet as a removable front panel or build a simple access gate.
- Make sure the structure is stable and doesn’t have exposed nails.
- Add alternating layers of dry leaves, shredded cardboard, grass clippings, and fruit or vegetable scraps.
- Keep the compost slightly moist and turn it periodically to improve airflow.
Money-saving tip: Save fall leaves in bags so you’ll have plenty of dry material to mix into your compost throughout the year.
Note: Avoid adding meat, dairy, oily foods, or pet waste to a basic backyard compost pile.
10. Pallet Daybed for the Patio
Want a cozy place to relax outside? A low pallet daybed is a fun weekend project and a much safer beginner-friendly alternative to a hanging pallet swing.
You’ll need: Clean pallets or reclaimed pallet boards, structural framing lumber, exterior screws, a drill, sandpaper, outdoor finish, and a weather-resistant cushion or mattress.
Instructions
- Measure your outdoor cushion or mattress to determine the size of the daybed.
- Build a stable, low platform using sound structural lumber for the frame.
- Attach reclaimed pallet boards across the frame to create the sleeping surface, supporting them adequately to prevent sagging.
- Make sure the platform sits level and cannot shift or tip.
- Sand the entire surface and remove all exposed nails or sharp edges.
- Apply an outdoor-rated finish and let it cure completely.
- Add your cushion, pillows, and a washable outdoor cover.
Money-saving tip: Look for clearance patio cushions at the end of summer, or repurpose cushions you already own.
Want a hanging swing bed instead? That requires properly engineered load-bearing supports, rated suspension hardware, and a verified attachment structure. Have a qualified professional evaluate the design and mounting location rather than suspending pallets from an unverified tree branch or porch beam.
Where to Find Free Wooden Pallets
Don’t have a pallet yet? You may be surprised how many businesses have extras they’re happy to give away. Always ask permission before taking one, even if it’s sitting outside.
- Facebook Marketplace: Search for “free pallets” in your area.
- Craigslist: Check the FREE section for leftover shipping pallets.
- Local hardware and garden stores: Ask whether they have any pallets available for pickup.
- Small businesses and warehouses: Some receive shipments on pallets they don’t reuse.
- Neighborhood giveaway groups: Post that you’re looking for clean pallets for DIY projects.
Keep in mind that some pallets are part of return or rental programs and aren’t available to take.
Tips for Working With Pallet Wood
- Remove nails carefully. Hidden nails can damage saw blades and cause injuries.
- Sand before painting. Pallet wood can be rough and splintery.
- Use primer. Reclaimed wood often absorbs paint unevenly, so primer helps create a smoother finish.
- Pre-drill screw holes. Dry wood can split when screws are driven near the ends.
- Choose the right fasteners. Use exterior-rated hardware for outdoor projects and structural hardware for anything that supports weight.
- Protect outdoor projects. A suitable exterior finish can help wood withstand moisture and sunlight.
My favorite part about pallet projects is that they don’t have to be perfect. A little leftover paint, some creativity, and a free pallet can turn into something genuinely useful!
Looking for more ways to save? Check out our DIY projects, home ideas, and money-saving tips for more ways to make the most of what you already have.